Custom Nodes
Overview
This guide will walk you through the process of creating a custom node for AnswerAgentAI. We'll be building a simple Calculator tool as an example. Custom nodes can only be deployed to AnswerAgentAI if you self host.
Prerequisites
- Git installed on your system
- AnswerAgentAI repository cloned locally
- Familiarity with TypeScript and Node.js
Step 1: Set Up the Project Structure
- Navigate to the
packages/componentschatflowstoolsdirectory in your AnswerAgentAI project. - Create a new folder named
Calculator.
Step 2: Create the Base Class
- Inside the
Calculatorfolder, create a new file namedCalculator.ts. - Add the following code to
Calculator.ts:
import { INode } from '../../../src/Interface'
import { getBaseClasses } from '../../../src/utils'

class Calculator_Tools implements INode {
    label: string
    name: string
    version: number
    description: string
    type: string
    icon: string
    category: string
    author: string
    baseClasses: string[]

    constructor() {
        this.label = 'Calculator'
        this.name = 'calculator'
        this.version = 1.0
        this.type = 'Calculator'
        this.icon = 'calculator.svg'
        this.category = 'Tools'
        this.author = 'Your Name'
        this.description = 'Perform calculations on response'
        this.baseClasses = [this.type, ...getBaseClasses(Calculator)]
    }
}

module.exports = { nodeClass: Calculator_Tools }
Understanding the Properties
| Property | Description |
|---|---|
| label | The name of the node that appears on the UI |
| name | The name used by code (must be camelCase) |
| version | Version of the node |
| type | Usually the same as label, defines which node can be connected to this specific type on UI |
| icon | Icon of the node |
| category | Category of the node |
| author | Creator of the node |
| description | Node description |
| baseClasses | The base classes from the node, used to define which node can be connected to this node on UI |
Step 3: Define the Core Functionality
- Create a new file named
core.tsin theCalculatorfolder. - Add the following code to
core.ts:
import { Parser } from 'expr-eval'
import { Tool } from '@langchain/core/tools'

export class Calculator extends Tool {
    name = 'calculator'
    description = `Useful for getting the result of a math expression. The input to this tool should be a valid mathematical expression that could be executed by a simple calculator.`

    async _call(input: string) {
        try {
            return Parser.evaluate(input).toString()
        } catch (error) {
            return "I don't know how to do that."
        }
    }
}
This class defines the actual functionality of our Calculator tool.
Step 4: Finalize the Node Class
- Update
Calculator.tsto include the initialization function:
import { INode } from '../../../src/Interface'
import { getBaseClasses } from '../../../src/utils'
import { Calculator } from './core'

class Calculator_Tools implements INode {
    // ... (previous code remains the same)

    async init() {
        return new Calculator()
    }
}

module.exports = { nodeClass: Calculator_Tools }
The init function will be called when the flow is executed, and the _call function will be executed when the language model decides to use this tool.
Step 5: Enable Community Nodes
- Open the
.envfile in thepackages/serverdirectory. - Add the following line:
SHOW_COMMUNITY_NODES=true
This allows AnswerAgentAI to recognize and use your custom node.
Step 6: Build and Run
- In the root directory of your AnswerAgentAI project, run:
pnpm build
- Once the build is complete, start AnswerAgentAI:
pnpm start
- Open the AnswerAgentAI interface in your browser. You should now see your Calculator node available in the Tools category.
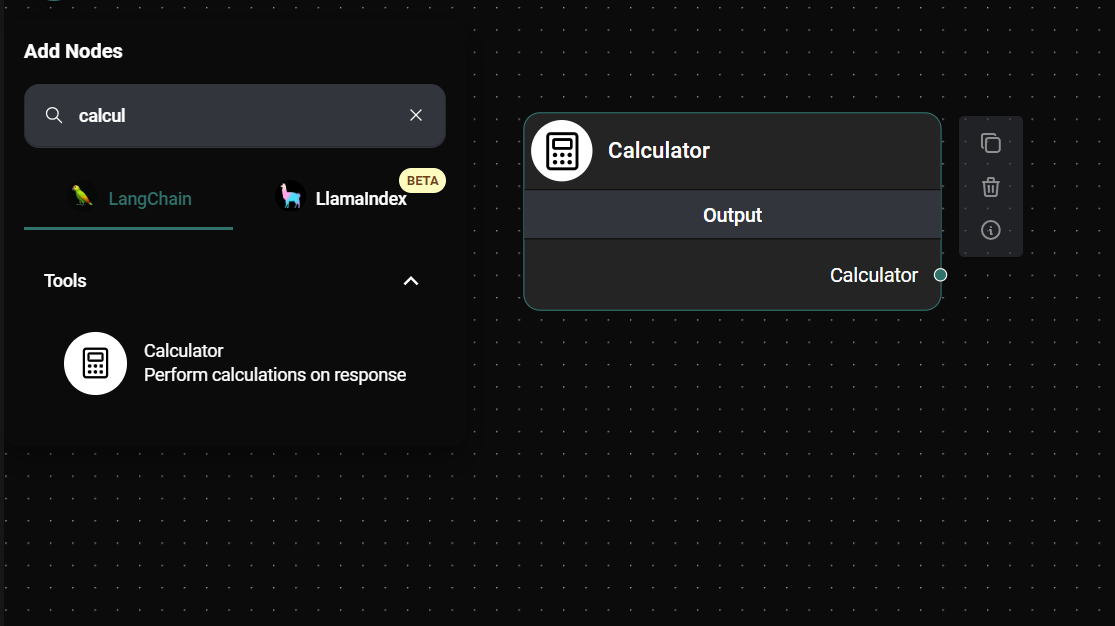
Calculator Node & Drop UI
Troubleshooting
- If your node doesn't appear, ensure that
SHOW_COMMUNITY_NODESis set totruein your.envfile. - Check the console for any error messages during the build or start process.
- Verify that your node's files are in the correct directory structure.
Next Steps
- Consider adding more complex functionality to your Calculator tool.
- Explore creating nodes for other categories, such as Memory or Chains.
- Share your custom node with the AnswerAgentAI community!
Remember to test your node thoroughly to ensure it interacts correctly with other components in AnswerAgentAI flows.